Growing a cannabis plant is a lesson in patience. From seedling to full bloom, every stage builds toward one defining moment: harvest. And while it’s tempting to focus on bigger yields or frostier buds, timing is what truly determines quality and knowing when to harvest cannabis is as crucial as it comes..
Get it right, and your cannabis plant delivers peak potency, rich flavor, and the full expression of its genetics. Get it wrong, and months of work won’t quite hit the mark.
But don't worry, with the right signs and a little discipline, you can harvest with confidence and let your plant finish strong.
When to Harvest Cannabis
In cannabis cultivation, harvest timing is where everything either comes together or falls short. You can grow a beautiful plant, stack on frosty flowers, and still miss the mark if you harvest at the wrong moment. The day you decide to harvest will directly affect potency, flavor, aroma, and the overall quality of the final product.
Cut too early, and those cannabis buds will fail to fully develop their cannabinoid and terpene profile. You’ll likely end up with lighter effects and less depth. Wait too long, and THC begins to shift, aromas fade, and your weed plant may lean toward heavier, sleepier results than you planned.
Simply put, harvest timing is the first, crucial decision in the last stage of growing process: harvest and cure. It’s your last chance to guide the type of experience the cannabis delivers, whether that’s a bright, uplifting effect or a richer, more relaxing one.
When to Harvest Marijuana: General Timeline by Grow Type
When growing cannabis seeds, the calendar matters less than what your eyes (and trichomes) are telling you. Environmental conditions such as temperature, humidity, and light intensity play a major role in how quickly cannabis plants mature, which is why harvest timing can shift even when strains are genetically similar. Bud development, trichome production, and how the plant matures will always give you the final answer.
While every strain has its own rhythm, there are reliable timelines that help you estimate when your plant may be ready for harvest. Think of these as guidelines, not deadlines.
Indoor Cannabis Harvest Timeline
For indoor growers, the key phase to watch is the marijuana flowering stage. Most photoperiod strains spend about 8-12 weeks in flower before they're ready for harvest, though some sativas may take longer.
During this period, trichome density ramps up, and bud development accelerates in the final weeks. If you’re harvesting marijuana plants indoors, always cross-check the breeder’s estimated flowering time with visual maturity because not every plant reads the schedule.
Outdoor Cannabis Harvest Season
Outdoor cannabis grows according to the natural light cycle. In the Northern Hemisphere, most plants are ready for harvest between late September and October, while Southern Hemisphere growers typically harvest around March or April.
As the plant matures outdoors, watch closely for peak trichome production and full bud development. Keep in mind that shifting weather can force your hand and move your timeline faster than expected.
Autoflower vs. Photoperiod Harvest Time
Autoflowers operate on their own clock. Most are ready for harvest about 8-12 weeks from seed, making them a fast and predictable option for growing cannabis. Photoperiod strains, on the other hand, depend on light cycles to enter the marijuana flowering stage, giving growers more control over size before bud development begins.
No matter the type, harvesting marijuana plants at the right moment always comes down to maturity, not just the number of weeks on the calendar.
The 7 Clear Signs It’s Time to Harvest Cannabis
When it comes to knowing when to harvest, the calendar can guide you, but the plant makes the final call. As your cannabis plant nears the end of its life cycle, it will send clear signals that the flowering phase is wrapping up.
Here’s what to watch for:
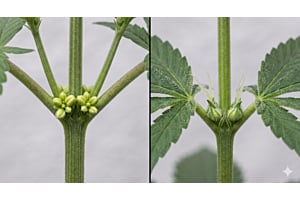
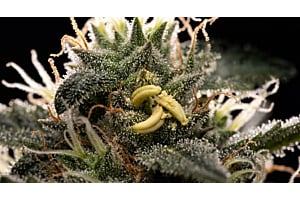
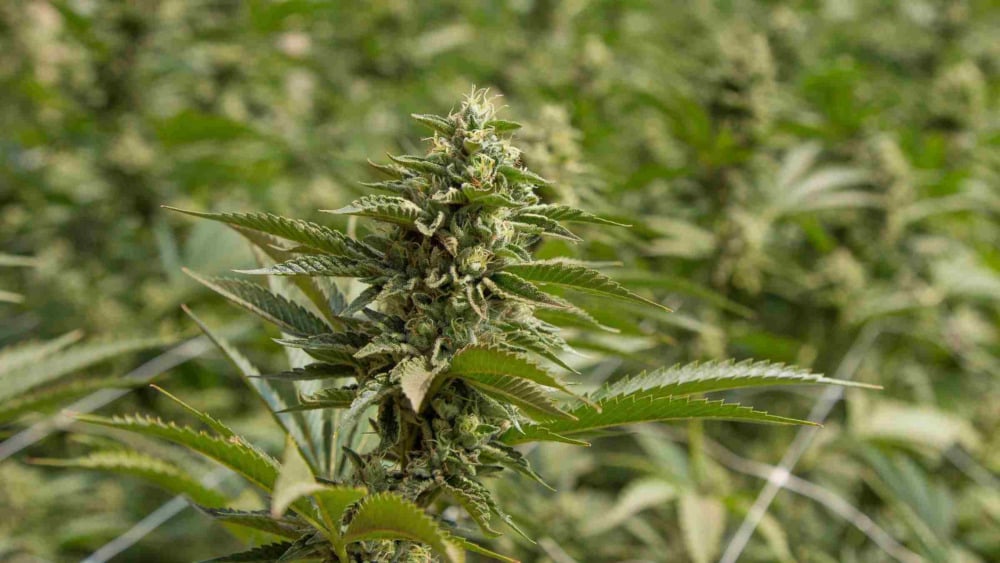
- Trichomes Shift from Clear to Milky to Amber: This is the gold standard. Clear trichomes mean the plant isn’t quite ready. Milky trichomes signal peak THC levels and a more energetic, uplifting effect. Amber trichomes indicate further maturation and a shift toward more relaxing results. A balanced mix of mostly cloudy with some amber is often the sweet spot for quality buds.
- Pistils Darken and Curl Inward: Those white hairs sticking out of your cannabis flowers will gradually turn orange, brown, or reddish as the buds mature. When most pistils have darkened and curled back toward the bud, it’s a strong sign you’re getting close. Just don’t rely on this alone; trichomes are more precise.
- Buds Swell and Look Fully Formed: In the final weeks of the flowering phase, calyxes expand and stack tightly together. The buds become denser, heavier, and visibly thicker. If your plant suddenly looks like it “filled out” almost overnight, that’s late-stage bud development in action.
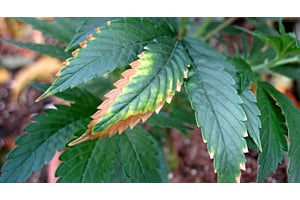
- The Plant Begins to Fade: As the cannabis plant reaches the end of its life cycle, fan leaves may yellow and drop. This process is called senescence and it is a natural cellular aging and fading that doesn’t mean poor overall plant health; it often signals the plant is redirecting its remaining energy into finishing the flowers.
- Aroma Peaks and Resin Feels Sticky: When opening your grow space hits you with a powerful wave of scent, that’s mature terpene expression. The buds should feel tacky to the touch thanks to heavy resin coverage, a clear indicator you’re approaching harvest time.
- Water Uptake Slows Down: Near the end, plants often take up less water. If your watering schedule suddenly stretches out and the medium stays moist longer than usual, it may be because the plant is winding down and nearly ready for harvest.
- Bud Density and Structure Feel Firm: Gently squeeze a bud (carefully). If it feels tight and compact rather than airy, and the structure looks complete, that’s another sign your cannabis flowers are approaching peak ripeness. Combined with strong trichome maturity, this confirms you’re close to harvesting truly quality buds.
What happens if you harvest cannabis too late?
THC converts to CBN as trichomes over-ripen, shifting the effect from balanced or uplifting toward heavy and sedative. Terpenes degrade too - the sharp aroma you had at peak ripeness fades and the smoke tastes flatter. A week or two past the ideal window won't ruin a harvest, but it will push the effect profile in a direction most growers aren't aiming for. Harvest once amber trichomes reach around 20-30% of what you're seeing on the buds.
How to Check If Cannabis Is Ready to Harvest (Step-by-Step)
While the general signs (like pistil color and leaf fade) tell you the plant is getting close, only a close-up inspection of the trichomes can tell you when your buds are at peak ripeness. This is the definitive method for maximizing potency and tailoring the final effect.
Step 1: Grab a Jewellers Loupe (Your Naked Eye Isn’t Enough)
If you’re serious about timing, you’ll need a jeweler’s loupe, a small microscope, or at least a solid magnifying glass. Trichomes are far too small to evaluate properly with the naked eye. They may look frosty from a distance, but their actual color and clarity tell the real story.
If you skip magnification, you risk the classic mistake of deciding to harvest early just because the buds seem ready.
Step 2: Inspect the Buds — Not the Sugar Leaves
This is where many growers slip up. Sugar leaves often show maturity faster than the actual flowers, meaning their trichomes can turn cloudy or amber before the rest of the plant is truly ready.
When checking ripeness, focus on the trichomes directly on the buds. Sugar leaves can give you a rough idea, but they shouldn’t be your deciding factor when you harvest your cannabis.
Step 3: Evaluate the Trichome Ratio
Now that you're zoomed in on the right spot, look at the color balance. Clear trichomes mean wait, while mostly cloudy indicates peak THC and a more uplifting profile. A mix of cloudy with some amber suggests a more balanced effect. If you want to go further, read our full guide on how to increase trichome production during your grow.
Different preferences—and even different cannabis strain characteristics—can influence your ideal ratio. Some growers prefer very few amber trichomes, while others let more develop before they harvest their cannabis.
Step 4: Cross-Check With Overall Plant Signals
Before you commit, zoom out and look at the bigger picture. Have the pistils darkened? Have the buds filled out and stopped stacking new growth? Has the plant slowed its water intake?
When multiple maturity signals line up, you can move forward confidently. In growing, patience almost always beats the urge to harvest early.
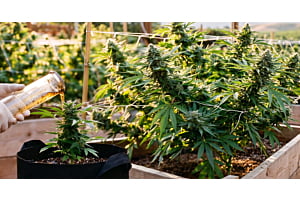
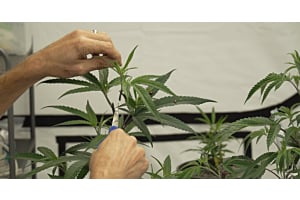
How to Harvest Marijuana
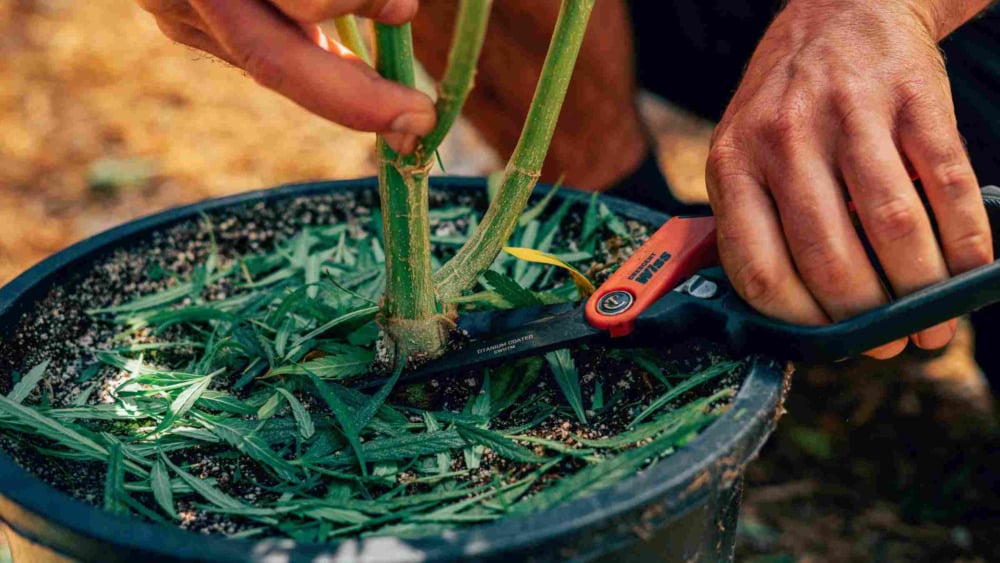
- Pick your harvest day (and don’t wing it):
Try to time your harvest right before the lights come on if you’re growing indoors, or early morning if growing outdoors. Cooler temps help preserve terpenes, and the plant tends to be a little less “sweaty” with moisture. - Set up your space like you’re about to perform plant surgery:
You’ll want: sharp pruning shears, clean gloves, a tray/bin for trim, rubbing alcohol for wiping tools, and hangers or drying lines ready to go. Clear a workspace so you’re not balancing sticky branches on your laundry pile. A clean setup protects flavor, reduces contamination risks, and makes the whole process way less chaotic. - Decide your method:
- Whole plant: Chop at the base and hang the entire plant (great for small grows and slower drying).
- Branch-by-branch: Cut and hang branches individually (easier to handle, good for medium grows).
- Staged/top-down: Take the top colas first, then let lower buds finish for a few more days (perfect for uneven canopies). Pick what matches your plant structure and drying space. There’s no “one right way,” only “what won’t make you regret it later.”
- Remove big fan leaves first (your future self will thank you):
Fan leaves don’t have much resin, and they slow the drying process. Pull them off right after cutting (or right before, either works). This step improves airflow around buds and makes trimming smoother. If you’re planning a dry trim, you can still take fan leaves now and leave sugar leaves for later. - Choose wet trim or dry trim (based on your climate):
If your area is humid, wet trim can be a lifesaver. If it’s dry, dry trimming can keep your buds from turning into crunchy disappointment.
- Wet trim: Trim sugar leaves right away, then hang buds/branches. Great in humid environments because it reduces moisture and mold risk.
- Dry trim: Hang first, trim after drying. Great in dry climates because it helps slow the drying and protects terpenes.
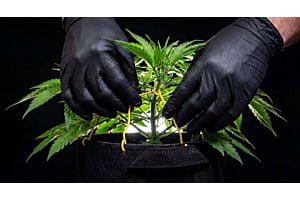
- Handle buds gently—trichomes are not glued on:
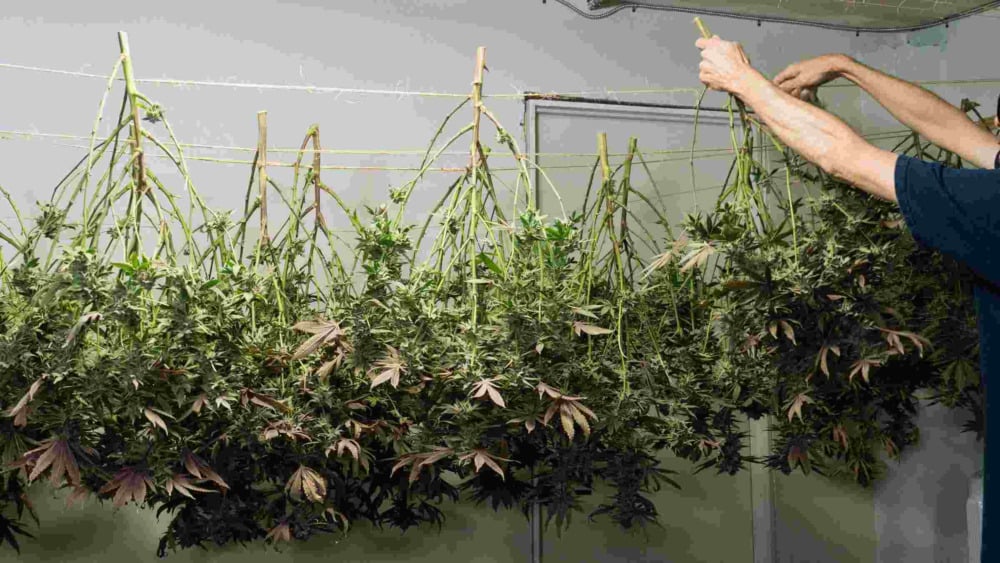
Try not to squeeze, rub, or aggressively “inspect” every cola. Those trichomes are where the good stuff lives, and rough handling knocks them off. Hold branches by the stem whenever possible and keep your workflow calm, not frantic. - Hang to dry immediately in the right conditions:
Hang branches (or the whole plant) upside down in a dark space with steady airflow and stable humidity. Avoid blasting fans directly at the buds, think “fresh breeze,” not “leaf blower.” Most growers aim for a slower dry to preserve aroma and smoothness. - Label and separate strains (because mystery jars are not a flex):
If you grew more than one strain, label everything now. Branches look identical once they’re hanging, and “I’ll totally remember” is a lie we’ve all told ourselves. A tiny label today prevents a month-long identity crisis later.
Different Cannabis Harvesting Methods (And When to Use Them)
We touched on these approaches in the previous section, but now it’s time to zoom in. The harvesting process isn’t one-size-fits-all. Your plant structure, grow space, climate, and even the different strains you’re running can influence which method makes the most sense.
Ultimately, the best method depends on your environment, your flowering period timing, and how evenly your plants mature.
There’s no universal “correct” technique, just the one that supports the highest-quality outcome for your grow. Choosing the right approach helps you stay within your ideal harvest window and get the most out of your final harvest, without unnecessary stress.
Whole-Plant Harvest
This is exactly what it sounds like: you cut the plant at the base and hang the entire piece. It’s simple, efficient, and ideal if your bud sites are ready at the same time.
Whole-plant harvesting tends to slow down drying slightly because the branches and stems remain attached. That can be a major advantage in dry climates, where buds might otherwise dry too quickly.
If your canopy was consistent and all buds appear ready at the same time, this method makes the process straightforward.
Branch-by-Branch Harvest
Instead of cutting the whole crop at once, you remove individual branches as they reach peak ripeness. This is helpful when plants mature unevenly or when different strains in your grow tent finish at slightly different times.
Branch-by-branch harvesting gives you more control over your harvest window and allows you to fine-tune your final harvest. It’s also easier to manage in smaller drying spaces, since you can stagger what gets hung.
For growers juggling multiple plants or varied phenotypes, this approach keeps things flexible without committing to a full chop too early.
Top-Down Harvesting
Top-down harvesting is essentially a strategic partial harvest. You remove the top colas first (since they typically receive the most light and mature fastest) while allowing the lower buds to continue developing for several more days.
This method is especially useful when the upper canopy looks ready, but the lower buds need more time to bulk up. By giving those shaded flowers extra light exposure after the tops are removed, you can increase overall yield and improve uniformity.
If you’re aiming to maximize quality across the plant rather than rush the entire crop, this approach can stretch your harvest window in your favor.
Wet Trim vs. Dry Trim
Trimming style plays a big role in the harvesting process. With a wet trim, you manicure buds immediately after cutting them down, removing sugar leaves before drying. This is often preferred in humid environments because it reduces moisture and mold risk.
Dry trimming, on the other hand, means hanging branches first and trimming after they’ve dried. This slower approach can help preserve structure and flavor, especially in arid climates where buds might otherwise dry too fast.
If you’re already planning on dry trimming, keeping more plant material intact during the initial cut can help regulate moisture and protect your final harvest.
Drying Cannabis Properly (Don’t Ruin Your Harvest Now)
You made it through months of growing, nailed your harvest window, and cut down beautiful flowers: now comes the part where patience really pays off. Proper drying and curing is what protects flavor, smoothness, and peak potency. Rush this stage, and even perfectly grown buds can end up harsh, flat, or worse… moldy.
Ideal Drying Conditions
Proper drying starts with the right environment. Aim for temperatures around 60–65°F (15–18°C) and a relative humidity between 50–60%. Darkness is essential, since light degrades cannabinoids over time. You want gentle airflow in the room, but never a fan blowing directly on the buds. Think steady circulation, not wind tunnel.
Controlling relative humidity is especially important. Too high, and you risk mold. Too low, and the outside of the buds will dry too fast, trapping moisture inside. That uneven dry can compromise both drying and curing later on.
How Long to Dry Cannabis
On average, drying takes about 7–14 days. Slower is usually better. During this period, buds continue to undergo subtle internal changes as moisture gradually leaves the plant material. A slow, controlled dry preserves terpenes and supports peak potency.
A simple way to check readiness is the “snap test.” Bend a small stem; if it snaps cleanly instead of bending, you’re ready to move into curing. If it still folds over, give it more time.
Common Drying Mistakes
The biggest mistake? Drying too fast. High heat and low relative humidity might seem efficient, but they strip away aroma and lead to harsh smoke. Another common issue is overcrowding your drying space, which restricts airflow and increases mold risk.
Remember, drying and curing work together. If drying is rushed or uneven, curing won’t magically fix it. Give this stage the time and control it deserves, and your buds will reward you with better flavor, smoother smoke, and the full expression of their genetic potential.
Trimming and Curing Cannabis for Maximum Potency and Flavor
Drying gets your buds stable. Trimming and curing are what make them exceptional. This is where harshness fades, aromatic compounds develop depth, and your harvest transforms from “fresh plant material” into smooth, flavorful flower. If drying protects quality, the curing process refines it.
Final Trim After Drying
If you chose to dry trim, now’s the time to manicure your buds. Carefully remove the remaining sugar leaves, shaping the flowers without overhandling them. Remember, those resin glands are delicate, so rough trimming can knock off the very compounds you worked months to develop.
Even after drying, buds tend to feel slightly pliable on the inside. That’s normal. You’re not aiming for brittle; you’re aiming for evenly dried with structure intact. A careful trim improves bag appeal, airflow in jars, and overall consistency before curing begins.
How to Cure Cannabis Properly
The curing process is simple but requires discipline. Place trimmed buds into airtight glass jars, filling them about 60–75% full so there’s room for air. Store jars in a cool, dark place and open them daily for the first 1–2 weeks. This “burping” releases excess moisture and refreshes oxygen inside.
During curing, moisture redistributes evenly throughout the buds. Aromatic compounds stabilize, chlorophyll continues to break down, and the smoke becomes noticeably smoother. Controlled humidity packs (58–62%) can help maintain ideal conditions, but consistency matters more than gadgets.
How Long to Cure for Best Result
Two weeks is the minimum for noticeable improvement, but 4–8 weeks is where the magic really happens. Over time, flavors become more pronounced and refined. Properly cured buds tend to burn more evenly, taste cleaner, and fully express their terpene profile.
Keep in mind that curing isn’t optional if you want maximum quality. It’s the final stretch of the journey, and the difference between decent flower and truly dialed-in results.
Common Harvest Mistakes to Avoid
- Rushing into an early harvest: Excitement is real, but cutting too soon is one of the most common grower mistakes. An early harvest often means lower potency, lighter aroma, and buds that never reach their full potential.
- Waiting too long and ending up with overripe buds: Patience is key, but there’s a limit. Overripe buds can shift toward heavier, more sedative effects as cannabinoids degrade. Leave them too long, and you may also see terpene loss and diminished flavor.
- Ignoring signs of bud rot: Especially in humid climates, bud rot can develop quickly near the end of flowering. Dense colas and high humidity are the perfect storm. Regular inspection during late flower protects your hard work from being lost right before harvest.
- Harvesting the entire plant when it’s uneven: Not all buds mature at the same rate. Cutting everything down at once can sacrifice lower sites that need just a few more days. Consider a staggered approach if your canopy isn’t uniform.
- Poor drying conditions after a perfect chop: Even if your timing was flawless, drying too fast (or in high humidity) can ruin flavor, smoothness, and overall quality. Harvesting is only half the equation; post-harvest care matters just as much.
- Skipping or shortening the cure: Freshly dried buds aren’t finished buds. Neglecting the curing stage leaves flavor, smoothness, and overall refinement on the table.
Final Thoughts: Patience Pays Off at Harvest Time
Harvest isn’t just the end of your grow; it’s the moment everything comes together. Nail your timing, dry with patience, cure with care, and you transform good flowers into truly exceptional ones. Rush it, and even great genetics can fall short.
The difference between average and outstanding often comes down to attention in these final weeks. Watch the signs. Trust the trichomes. Respect the process.
Grow with intention, harvest with confidence, and let your hard work speak for itself.
Frequently Asked Questions: When to Harvest Cannabis
How do you know when a bud is ready to harvest?
The most reliable method is checking trichome color under a jeweler's loupe or small microscope. Clear trichomes mean the plant needs more time. Milky white trichomes signal peak THC and the best window for an uplifting effect. A mix of mostly cloudy with some amber trichomes is the sweet spot for most growers. Supporting signs include darkened and curled pistils, fully swollen calyxes, slowed water uptake, and strong resin smell. Use all of these together rather than relying on any single indicator.
What do trichome colors mean at harvest time?
Trichome color is your most accurate gauge of cannabinoid maturity. Clear trichomes indicate the plant is still developing and harvesting now will result in lower potency. Milky or cloudy trichomes signal peak THC levels and a more energetic, cerebral effect. Amber trichomes show that THC has begun converting to CBN, shifting the effect toward something heavier and more sedative. Most growers target a ratio of mostly cloudy with 10-20% amber for a balanced result, though this comes down to personal preference and the strain you're growing.
Should I stop watering before harvest?
Yes. Most growers stop watering 1-3 days before harvest to allow the growing medium to dry out slightly. This minor stress can encourage the plant to redirect its remaining energy into resin production, and a drier medium makes handling and drying easier after the chop. Avoid going so long without water that the plant visibly wilts, as that can stress the buds and affect quality. One or two missed waterings in the final days is plenty.
Does a 3-day dark period before harvest increase THC?
This is a debated topic with limited scientific backing, but some growers swear by it. The theory is that extended darkness triggers the plant to produce more resin as a UV-protection response. Anecdotal reports suggest it may slightly boost trichome density and terpene expression. In practice, the gains are likely marginal compared to nailing your harvest timing correctly in the first place. If you want to try it, a 24-48 hour dark period is more commonly used and considered lower risk than a full 3 days.
What happens if you harvest cannabis too late?
THC converts to CBN as trichomes over-ripen, shifting the effect from balanced or uplifting toward heavy and sedative. Terpenes degrade too - the sharp aroma you had at peak ripeness fades and the smoke tastes flatter. A week or two past the ideal window won't ruin a harvest, but it will push the effect profile in a direction most growers aren't aiming for. Harvest once amber trichomes reach around 20-30% of what you're seeing on the buds.