Autoflowers go from seed to harvest in about 8 to 12 weeks, which is why growing autoflowers is the default starting point for so many first-time growers. The plants stay small, flower on their own timetable and forgive the small mistakes a longer cycle would punish. This autoflower grow guide covers the full life cycle of autoflowering cannabis seeds.
You'll learn how to grow autoflowers indoors and outdoors, the setup essentials, week-by-week care to protect your yield, plus mistakes to avoid. Use it where home cultivation is lawful for eligible adults under federal, state and local rules.
What Are Autoflowering Cannabis Seeds?
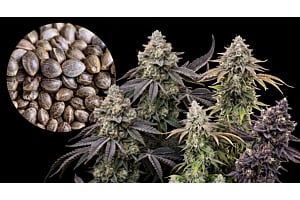
Autoflowering cannabis seeds are cannabis seeds that flower based on plant age, not the light cycle. A photoperiod plant only starts making buds when daylight drops to around 12 hours. An autoflower starts producing buds when it hits 3-5 weeks old, regardless of light. That single trait makes autoflowers fast, compact and beginner-friendly.
Autoflowers exist because of a third cannabis subspecies called Cannabis Ruderalis, a hardy wild type first identified along the Volga River in southern Siberia. Breeders crossed ruderalis with regular indica and sativa lines, then refined the hybrids over years. The goal was to keep the autoflowering trait while pulling potency, yield and flavor back up.
Today's autoflowering seeds are far from the weak first-generation autos of the early 2000s. Many modern autos match photoperiod strains for THC, terpene profile and resin coverage. Genetics work has also tightened up flowering windows and improved resistance. The seed catalog you shop today looks nothing like the one from 15 years ago.
How Autoflower Genetics Trigger Flowering
Autoflower genetics trigger flowering on a built-in clock. Once the plant reaches a certain age (usually 3-5 weeks after germination), the ruderalis DNA flips the plant into bloom. No timer change, no light adjustment, no grower input required. This is why autoflowers can run a single 18/6 light schedule from day one to harvest day.
How Long Autoflowers Take From Seed to Harvest
Autoflowers finish the full cycle in 8-12 weeks from germination, with slower sativa-dominant autos sometimes pushing to 13 or 14 weeks. Faster strains like Big Devil Auto or Granddaddy Purple Auto can be ready around week 8 or 9. The exact life cycle period depends on strain genetics, environment and how much stress the plant ran into during veg.
What You Need Before Growing Autoflowers
Growing autoflowers requires a short list of setup choices made before the seed touches soil. Get these wrong and the plant runs out of cycle before you can fix the problem. Get them right and the plant handles most of the work itself. Four decisions cover almost every grow
- Choosing autoflower seeds for your goals: picking the right strain for your climate, space and preferred effects.
- Picking the right pot size: pot size sets the ceiling on plant size and yield.
- The best soil recipe: light, airy soil suits the short cycle.
- Lighting setup: one schedule from start to finish.
Choosing Autoflower Seeds for Your Goals
Autoflower weed seeds differ by THC or CBD content, flowering window and climate fit. High-THC autos like Northern Light Auto or Runtz Auto suit growers chasing potency. Auto CBD strains like CBD White Widow Auto suit growers who want lower THC and a calmer profile.
Cold-climate autos resist temperatures down to about 50°F, which matters for northern outdoor grows. Pick the strain that matches your goal first, then check the breeder's stated flowering window. Match the strain to your space before you order.
Picking the Right Pot Size for Autoflowers
Pot size determines how big your autoflower will grow and how much it will yield. Use the final pot from day one because autoflowers do not respond well to transplanting. The shock can stall them mid-cycle and there is no time to recover.
- Small autos that top out around 24 inches do well in a 3 to 5-gallon fabric pot, with 5 gallons giving more root room for steady growth.
- For medium-to-large autos in the 30 to 50 inch range, use a 5 to 7 gallon fabric pot.
Fabric pots beat plastic because the roots breathe through the walls and self-prune. That keeps the root mass dense and well-oxygenated. Plastic pots can work but airflow at the roots will be lower.
Autoflowers yield less than photoperiods on average, so growers chasing weight often pair them with high-yielding pot seeds in a separate cycle. The autoflower run becomes the fast-turnaround crop. The photoperiod run becomes the heavy-yield crop. Many growers stagger both inside one calendar year.
The Best Soil Recipe for Autoflowers
A light, airy soil mix suits autoflowers because their short cycle leaves no room for nutrient burn. Pre-fertilized "hot" soils designed for hungry photoperiod plants can torch an autoflower's roots in the first week. The young plant cannot recover the lost growth before flowering starts.
Build the mix from these four ingredients:
- 3 parts peat moss or coco coir: holds moisture without compacting.
- 3 parts mature compost: provides slow-release nutrition.
- 2 parts perlite: opens up the mix for drainage and root aeration.
- 1 part vermiculite: balances water retention with airflow.
Light, mildly fertilized soil carries most autos through the entire veg phase with little or no added feeding. Add a small amount of mycorrhizae at planting if you want stronger root colonization. Skip aggressive amendments. Save heavier feeding for the flowering stage.
Lighting Setup for Autoflowers Indoors
Autoflowers run on an 18 to 24-hour light schedule from seed to harvest, with 18/6 the most common default. Eighteen hours of light, six hours of dark, every day of the cycle. Some growers push to 20/4 or 24/0 for more growth, but 18/6 gives the plant a rest period and cuts the electric bill.
A 250-watt LED handles one large auto or four trained autos in a 2x2 ft tent. Switch the LED to a cooler blue spectrum during veg. Switch to a warmer red spectrum once flowers start forming. Most modern full-spectrum LEDs handle the transition with a single dial.
How to Grow Autoflowers Week by Week
Autoflowers move through five stages in 8 to 12 weeks: germination, seedling, vegetative, flowering and harvest. Each stage has its own water needs, feeding plan and risks. The week numbers below are typical. Fast strains finish a week or two earlier; slow strains a week or two later.
- Week 1: germinating the seed and getting it above the soil.
- Weeks 2-3: the seedling stage, where roots and first true leaves develop.
- Weeks 3-4: vegetative growth, where the plant builds its frame.
- Weeks 4-8: flowering, where buds form and pack on weight.
- Weeks 8-12: flushing, harvest and the trichome check that calls the cycle.
Week 1: Germinating Autoflower Seeds
Autoflower seeds germinate in 2-5 days under warm, moist conditions. One of the most reliable germination methods is the paper towel approach. Here’s how it works:
- Fold your cannabis seeds inside damp paper towels and slide the towels between two plates. Keep them somewhere dark at 70 to 78°F.
- Check every 12 hours.
- Once the taproot pushes out about a quarter inch, transfer the seed taproot-down into a small hole in your final pot.
- Plant it about half an inch deep and cover lightly with soil. Water with a gentle spray so you don't dislodge the seed.
Keep humidity high and temperature steady through the first few days. A clear plastic dome over the pot helps trap moisture.
Weeks 2-3: The Autoflower Seedling Stage
The autoflower seedling stage lasts about 1-2 weeks and ends when the plant starts vertical growth. The first leaves that emerge are the cotyledons: small, round, smooth-edged. Those are not real cannabis leaves. Real cannabis leaves are the serrated, fingered leaves that appear next, starting with one finger and adding more with each new node.
During this stage your seedling drinks very little water, maybe 50-100ml every couple of days. Keep humidity at 65-70% and temperature at 72-77°F. Hold the LED about 24 inches above the canopy. No nutrients yet because the soil carries the plant.
Weeks 3-4: Autoflower Vegetative Growth
Autoflower vegetative growth builds the stem, leaves and root mass that will carry the buds. The plant doubles or triples in size during this phase. Water demand jumps to about 500ml per day for medium autos. The plant starts to look like a small cannabis plant rather than a seedling.
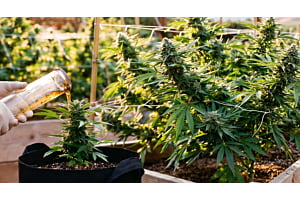
Drop humidity to 50%, hold temperature at 72-77°F and lower the LED to about 18 inches above the canopy. This is the only window where low-stress training works on an autoflower. Start a quarter-strength veg nutrient if your soil is running thin. Skip nutrients entirely if you're using a pre-amended mix.
Weeks 4-8: Autoflower Flowering Stage
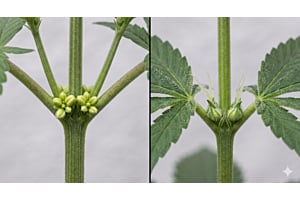
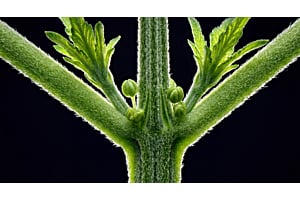
The autoflower flowering stage begins when white pistils appear at the nodes around week 4 or 5. The pistils are the small white hairs that emerge from a pointed structure called a calyx. Pistils confirm the plant is female and committing to bud production. Switch your LED from blue to red spectrum.
Drop humidity to 40-45% to keep mold off the developing flowers and switch to a bloom nutrient at half strength. Bloom nutrients carry higher phosphorus and potassium with less nitrogen. Over the next 3-4 weeks the buds, sometimes called nugs at this stage, swell and gain density. Aroma intensifies fast.
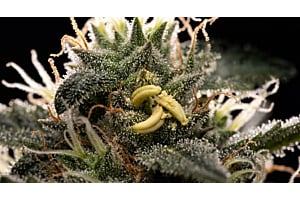
Watch for any banana-shaped structures sticking out of buds. Those are hermaphrodite pollen sacs and need to be removed before they pollinate the rest of the plant. A male vs female weed plant has specific differences worth knowing. Inspect every plant once a week from week 5 onward.
Weeks 8-12: Flushing and Harvest
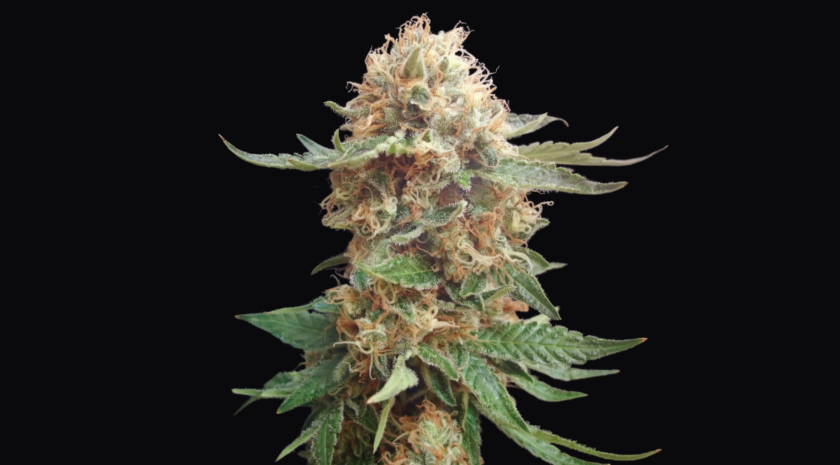
Autoflowers reach harvest when most trichomes turn milky white with some amber. Trichomes are the tiny glandular hairs covering the buds. They look like clear stalks topped with small bulbs. Their color reads the ripeness of the marijuana plant.
In the final 7 to 14 days, many growers stop feeding nutrients and start flushing, although the practice is debated. Water the pot with plain pH-adjusted water and let runoff drain out.
Flushers argue this pulls excess salts from the soil for a cleaner smoke. The alternative is to taper nutrients down rather than cut them entirely. Repeat the flush a few times across the last two weeks if you go that route.
Cut the branches at the base when the trichome window is right, then move on to drying and curing (covered below).
How to Grow Autoflowers Indoors vs Outdoors
Autoflowers grow well indoors and outdoors, and the environment decides which setup costs and yields make sense. Indoor grows give total control and run year-round. Outdoor grows cost almost nothing in equipment but depend on weather and season. Most home growers pick one based on space and climate.
Growing Autoflowers Indoors in a Grow Tent
Growing autoflowers indoors works best in a small tent with steady temperature, light and airflow. A 2x2 ft tent fits one large auto or two to four small ones. A 3x3 ft tent fits two to four medium autos comfortably. Tents trap light, control humidity and let you run fans without losing efficiency.
Most indoor autoflowers finish at 18-36 inches tall. Larger sativa-leaning autos can hit 40-48 inches in a 5-gallon pot. Micro grows in small cabinets under 18 inches of vertical clearance work too. Pick a short, indica-leaning strain for those, or expect to bend the plant down with LST.
Growing Autoflowers Outdoors
Growing autoflowers outdoors works in almost any climate that stays above about 60°F during the cycle. Plant after the last frost and the autos will finish in 8-12 weeks regardless of when the days shorten. In the U.S., you can plant in May and harvest in July or August, plant in July and harvest in September or October, or stagger two crops in one season.
Outdoors, autoflowers need 6-8 hours of direct sun, well-draining soil and protection from heavy wind. Outdoor grows are only lawful where local rules allow home cultivation by eligible adults. Check federal, state and local laws before planting. Pick a strain rated for your zone if cool nights or short summers are likely.
Can You Train Autoflowers?
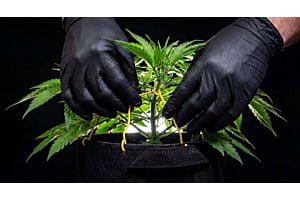
Yes, but only with low-stress methods that do not slow the plant down. High-stress training like topping, fimming or heavy defoliation cuts into the autoflower's short veg window. The plant cannot recover the lost time before flowering kicks in. Low-stress training (LST) works because it doesn't damage the plant.
LST involves tying the main stem horizontal during weeks 2 and 3 of veg. This spreads out the canopy and exposes more bud sites to the light. Done right, LST can lift autoflower yields by 20-30% with no added stress. Soft garden wire and a few anchor points on the rim of the pot are all you need.
Topping an autoflower is not a beginner move. The few growers who get away with it use very vigorous strains and an early week-2 cut. Any later and the plant flowers before it can grow the side branches the top is supposed to encourage. Skip topping entirely unless you’re a pro.
Drying and Curing Autoflower Buds
Autoflower buds need 7-14 days of drying and 2-4 weeks of curing before they smoke well. Here’s what you need to know:
How to Dry Autoflower Buds
Drying happens at 60-70°F and 55-60% relative humidity in a dark, ventilated room. Hang whole branches upside down or use a drying rack. Buds are ready when the small stems snap cleanly instead of bending.
How to Cure Autoflower Buds
Trim off the fan leaves and sugar leaves, then jar the buds in wide-mouth glass jars filled three-quarters full. Burp the jars (open them for a few minutes) once a day for the first 14 days. After that, burp once a week. Curing stabilizes the cannabinoid and terpene profile, mellows the smoke and improves aroma.
Most growers find autoflower buds peak around week 4 of curing. Properly cured flower stores for months in airtight glass jars away from heat and light.
Common Autoflower Growing Mistakes (and How to Avoid Them)
Most autoflower growing mistakes come from treating autoflowers like photoperiod plants. The biggest one is overwatering. Autoflowers drink less than photos because they're smaller, and soggy soil suffocates roots in a plant that doesn't have time to recover. Let the top inch of soil dry between waterings.
The second mistake is transplanting. Never move an autoflower from a small pot to a bigger one mid-cycle. The shock can cost the plant a week of growth it can't afford. Plant directly in the final pot from day one.
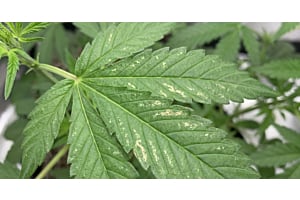
The third mistake is overfeeding. Autoflowers need a quarter to half the nutrients a photoperiod plant takes. Nutrient burn shows up fast on the small leaves, with brown leaf tips and curled edges. Start at a quarter strength and only push higher if the plant looks pale.
Autoflowers are popular marijuana seeds for beginners because the short cycle hides small mistakes. But the cycle also means there's no second chance inside one grow. A photoperiod plant gives you weeks to fix a problem. An autoflower gives you days.
How Autoflower Seeds Compare to Feminized and Other Cannabis Seeds
Autoflower seeds sit alongside feminized and regular cannabis seeds as the three main seed types growers choose between. Feminized seeds produce female plants almost every time but flower on a 12/12 light schedule. That gives more control over plant size and harvest timing but adds 2-4 weeks to the cycle.
If you're running back-to-back cycles, many growers pair their autoflower harvest with a separate run of feminized weed seeds for the next season. The two seed types complement each other.
Regular seeds produce a roughly 50/50 split of male and female plants. The male plants need to be culled before they pollinate the females. Most home growers skip regulars because the sorting work cuts into useful canopy. Breeders still use regulars to make new strains.
Autoflowers skip the light-schedule planning and finish fast, but yield less per plant on average. They suit small spaces, short seasons and growers who want speed over volume. They also suit growers who want multiple harvests in one calendar year. The trade-off is plant size and total weight per cycle.
If you also grow photoperiod strains, the feminized vs autoflower seeds breakdown shows where each seed type wins. Many growers run both inside one season: autoflowers for the quick turnaround, photoperiods for the heavy harvest. Two seed types, two cycles, one calendar year.
Frequently Asked Questions About Growing Autoflowers
Still have questions? Here are some answers to the most common questions we get about growing autoflowers.
Do Autoflower Seeds Produce Male Plants?
Yes, regular autoflower seeds can produce either, so most home growers buy feminized autos to skip the sorting step. Feminized autoflower seeds yield female plants around 99% of the time. Choose feminized autos unless you specifically want to breed your own seeds. The 1% hermaphrodite risk is rare and usually triggered by stress.
Can You Top An Autoflower?
Technically, yes but topping an autoflower is extremely risky because the short cycle leaves little room for recovery. Vigorous strains can sometimes handle a single top during week 2 of veg. Most growers stick to low-stress training (LST), which lifts yields without costing recovery time. If you top, do it early and only once.
How Tall Do Autoflowers Get Indoors?
Most indoor autoflowers finish between 18 and 36 inches tall in a 3-5 gallon pot. Sativa-leaning autos can reach 40-48 inches. Indica-leaning autos usually stay under 24 inches. Genetics, low-stress training and pot size are the biggest levers on final height.
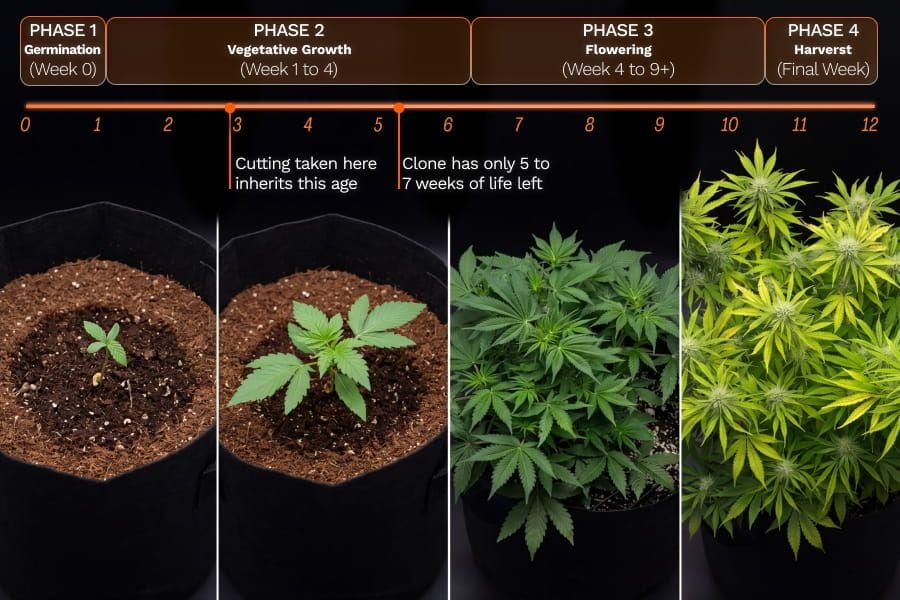
Can You Clone An Autoflower?
Yes, you can technically take a cutting, but the clone will flower at the same time as the parent. That means the clone inherits the parent's biological age and produces tiny buds. Autoflowers are not made for cloning. For clones, grow photoperiod plants instead,