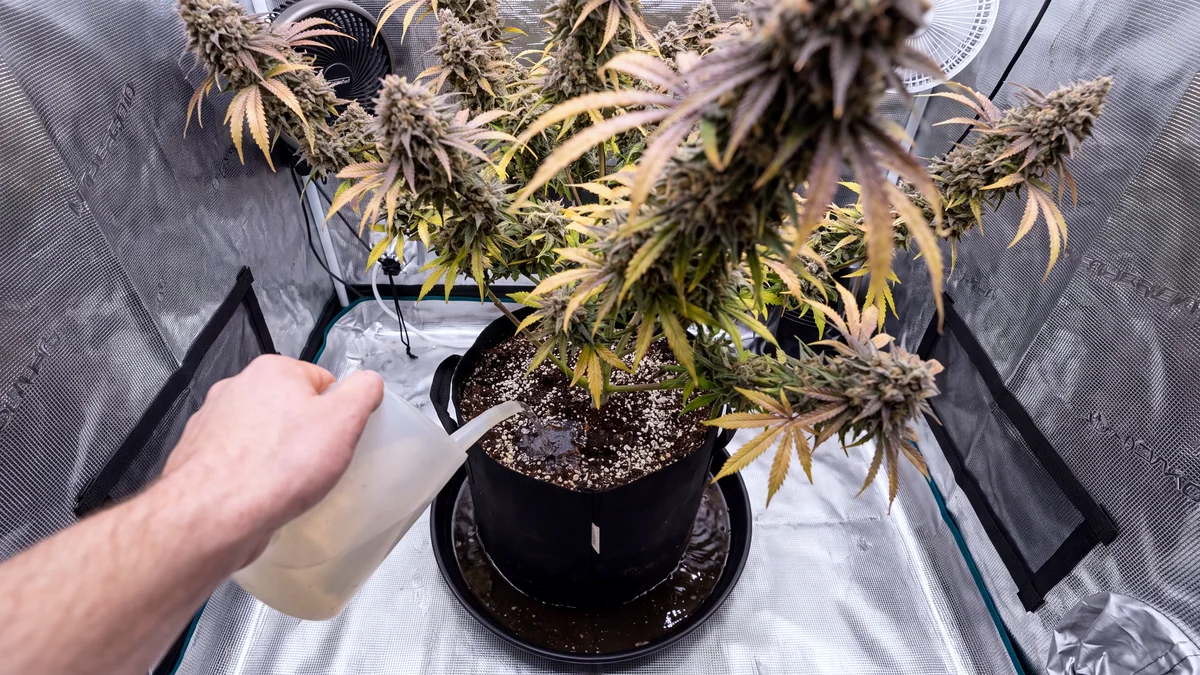
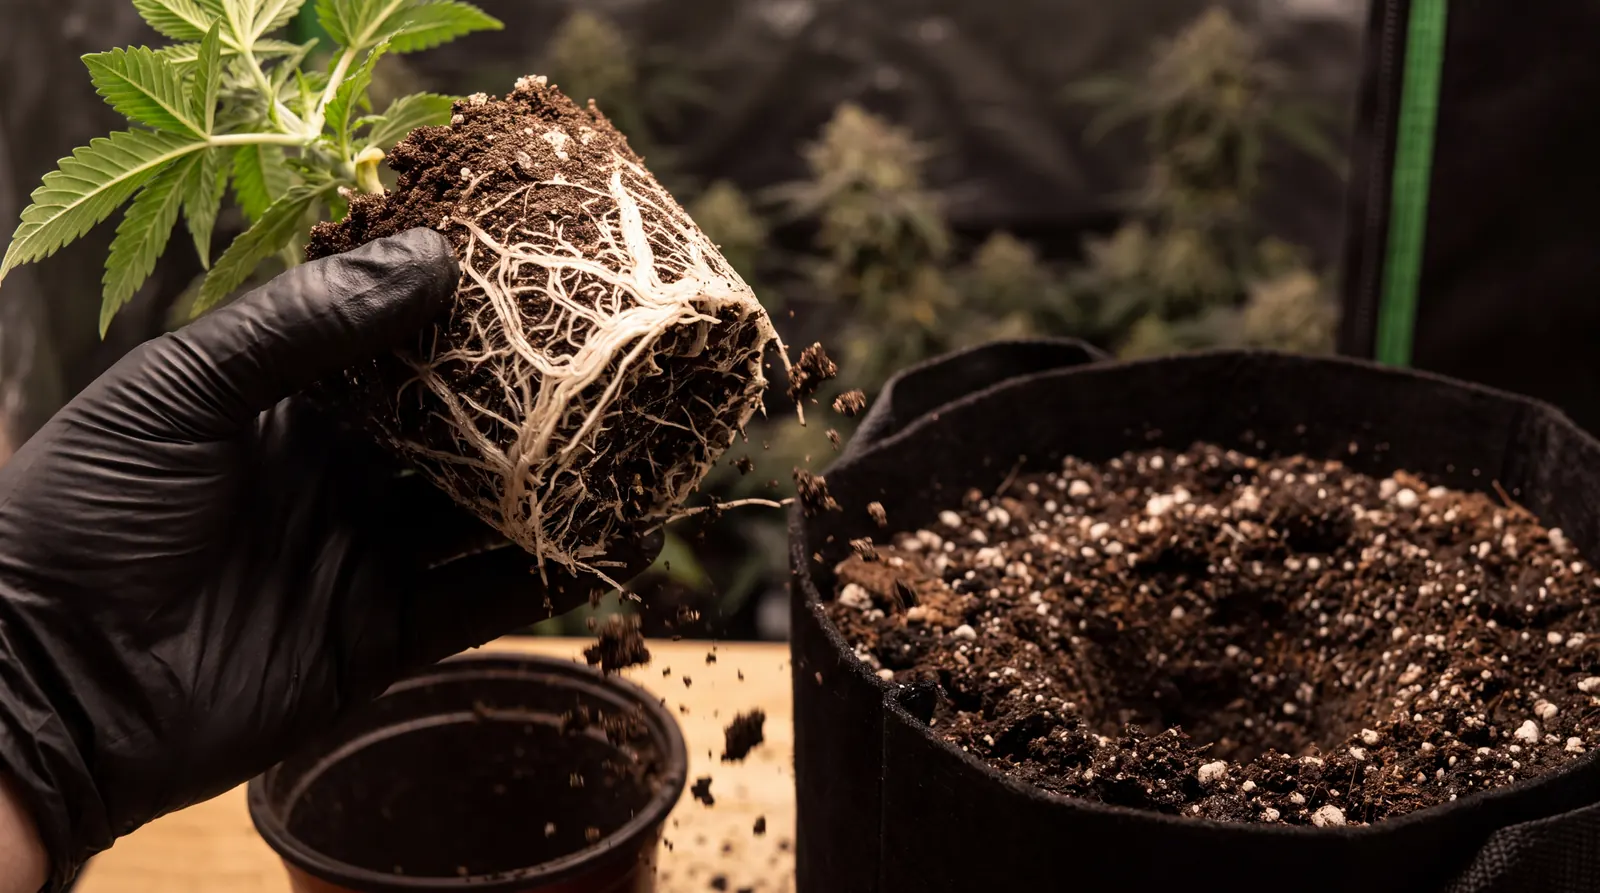
Knowing when to transplant cannabis comes down to looking at the roots. Move seedlings once roots reach the drainage holes and they have 3–5 sets of true leaves. Move clones once 1- to 2-inch white roots show through the plug, and larger weed plants once roots fill the pot. Each time, transplant to a pot about 2–3 times bigger in a few easy (yet careful) steps:
Lift the root ball out, set it into a moist, pre-dug hollow at the same depth, and water it in. If you’re growing photoperiod feminized seeds, you can expect 1–3 transplants depending on plant size.
This guide shows you precisely how and when to transplant, whether you’re working with marijuana seedlings, cannabis clones, or plants that have outgrown their pots. It also covers recovery tips, how to deal with transplant shock, when to feed, and what to do with autoflowers.
When to Transplant Cannabis: Signs Your Plant Is Ready
It’s time to transplant when the roots have filled the current pot and the cannabis plant has outgrown it. Watch for these signs:
- Roots at or through the drainage holes: The roots have reached the bottom of the container and have nowhere left to grow.
- Roots poking out of the sides of a plug or cube: Seedlings in starter plugs or rockwool cubes are ready to move up once roots break through the outside.
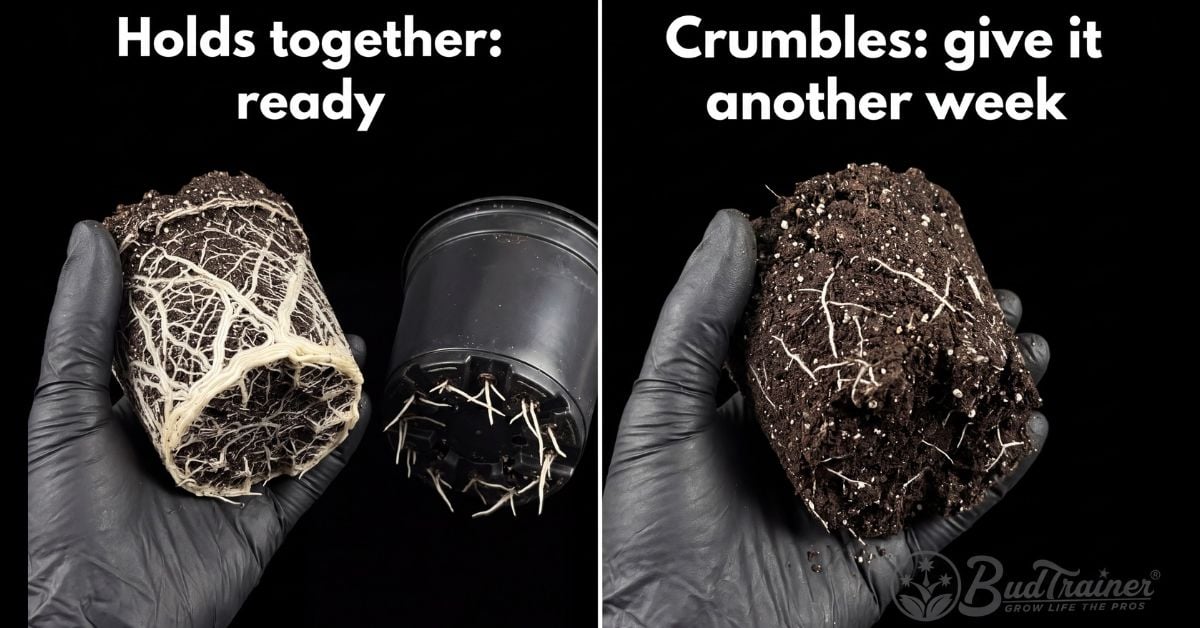
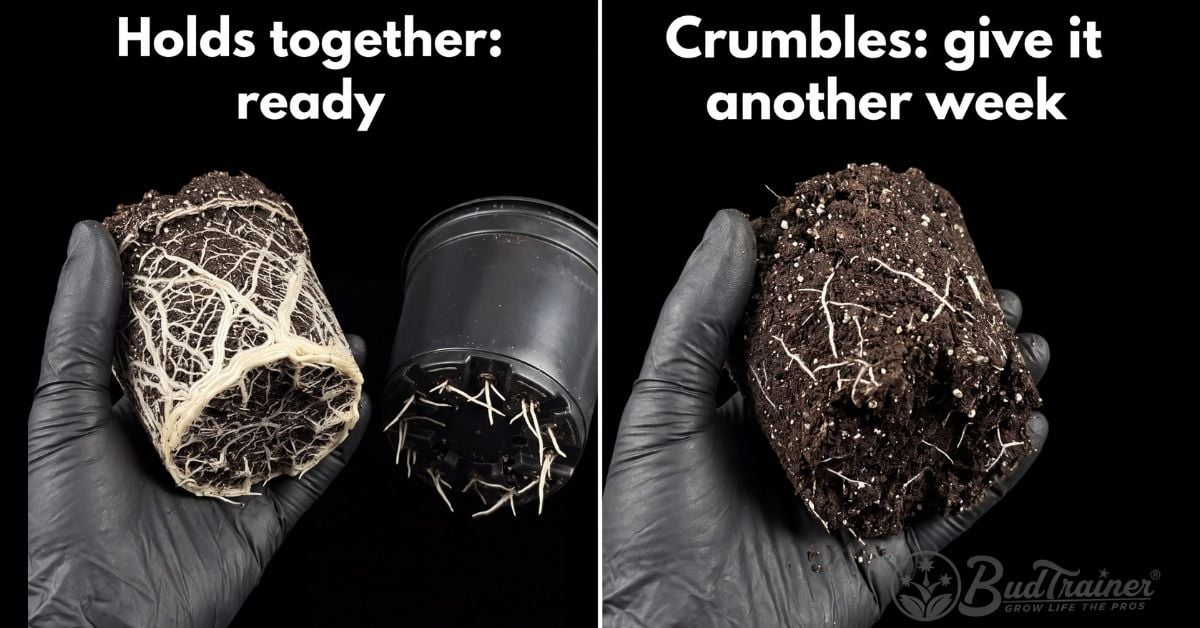
- A dense white mat around the root ball: When you lift the plant out, roots wrapped thickly around the outside of the medium show the pot is full.
- A canopy as wide as the container or wider: The top growth has outpaced the root space below it.
- A plant that tips over easily: A top-heavy weed plant in a small pot no longer has enough root mass and medium to anchor it.
- Growth that’s slowed while conditions stayed the same: If light, feeding and temps haven’t changed but new growth has stalled, the roots may be out of room.
- A pot that dries out much faster than it used to: More roots and less medium means the same pot empties sooner.
One sign alone proves little, since slow growth and fast dry-back have other causes. When two or three signs line up, it’s more than likely time to transplant.
Want to be sure? Water a few hours earlier, hold the stem base between two fingers, tip the pot and ease the root ball out partway. If it holds together as a webbed mass of roots, it’s ready. If it crumbles, slide it back and give it another week.
When to Transplant Marijuana Seedlings
Transplant marijuana seedlings when their roots have filled the starter pot, usually 2–4 weeks into the seedling stage. A seedling is ready when it shows these signs:
- White roots at the drainage holes or through the sides of the plug: Once roots reach the bottom and edges of a plug, rockwool cube, or cup, there’s no fresh medium left for them to grow into.
- 3–5 sets of true leaves: Count the serrated leaf pairs above the cotyledons (the two round seed leaves that open first). Seedlings with fewer sets usually haven’t built enough roots to hold together when moved.
- A leaf span wider than the rim: When the leaves stretch past the edge of the cup or pot, the plant has outgrown it. This is the quickest check in opaque containers where you can’t see the roots.
Starter size changes the timing of these signs. Roots fill a plug or solo cup quickly, so expect the signs earlier. A larger starter pot can push transplanting back by a week or two. With clear plastic cups, you can see the roots reach the sides without pulling the plant out.
Judge each seedling on its own — don’t move a whole tray at once. Vigor varies, whether you’re only dealing with indica or sativa seedlings. If the roots haven’t reached the bottom of the starter pot, leave the baby weed sprout where it is. A small root mass falls apart easily, and broken roots will only set growth back.
When to Transplant Cannabis Clones
Transplant cannabis clones once their roots have grown out of the plug, cube, or cloner site. Leaf count doesn’t matter here, because a cutting keeps the leaves it was taken with and doesn’t add true leaves the way a seedling does. Check the roots and match what you see:
| What You See | What It Means | What To Do |
| Several firm whitish roots, about 1–2 inches long showing through the plug or cube, or a visible root mass | The roots are developed enough to support the clone in a bigger pot | Pot it up |
| A few thin roots barely breaking the surface | The root system is still too small to hold the cutting | Leave it where it is and check again in a few days |
| Brown, soft or slimy roots | A rooting problem, not a sign of readiness | Hold off on transplanting until healthy white roots develop |
Moving a marijuana clone too early leaves it with too few roots to anchor it in the new medium. Waiting too long lets the roots circle inside the small block. Either way, the first move is into a modest pot, not the final container.
When to Transplant a Weed Plant Into Its Final Pot
Transplant a weed plant into its final pot once its roots have filled the current one and it still has enough veg time left to root into the new mix. For photoperiods, that means finishing the move before flowering begins, with enough time for the plant to recover first. A plant that’s already putting its energy into buds has far less chance to spread roots through a new pot.
Indoors, you control that deadline. Transplant at least 1–2 weeks before you flip to 12/12, so the plant recovers while it’s still building structure in veg. If the roots fill the current pot well before you’re ready to flip, add an in-between pot instead of going straight to the final one. Don’t flip early to match the root timing, because that cuts veg short.
Outdoors, the season sets the deadline. Photoperiod plants start flowering as nights get longer in late summer, so the final move into a large container or the ground should happen early in the season. That gives the roots the long summer days to fill the new space before flowering begins.
Before You Transplant: Choose the Right Pot Size
Each new pot should hold about 2–3 times the volume of the current root ball. Across a full photoperiod grow, that usually adds up to 2–4 containers in total, depending on how big you want the plant and how long you veg.
| Stage | Typical Pot Size |
| Starter | Plug or solo cup (about 16 oz) |
| First step-up | About 1 quart to half a gallon |
| Second step-up | About 1 to 1.5 gallons |
| Third step-up | About 3 gallons |
| Final container | Commonly 5 to 10 gallons or larger |
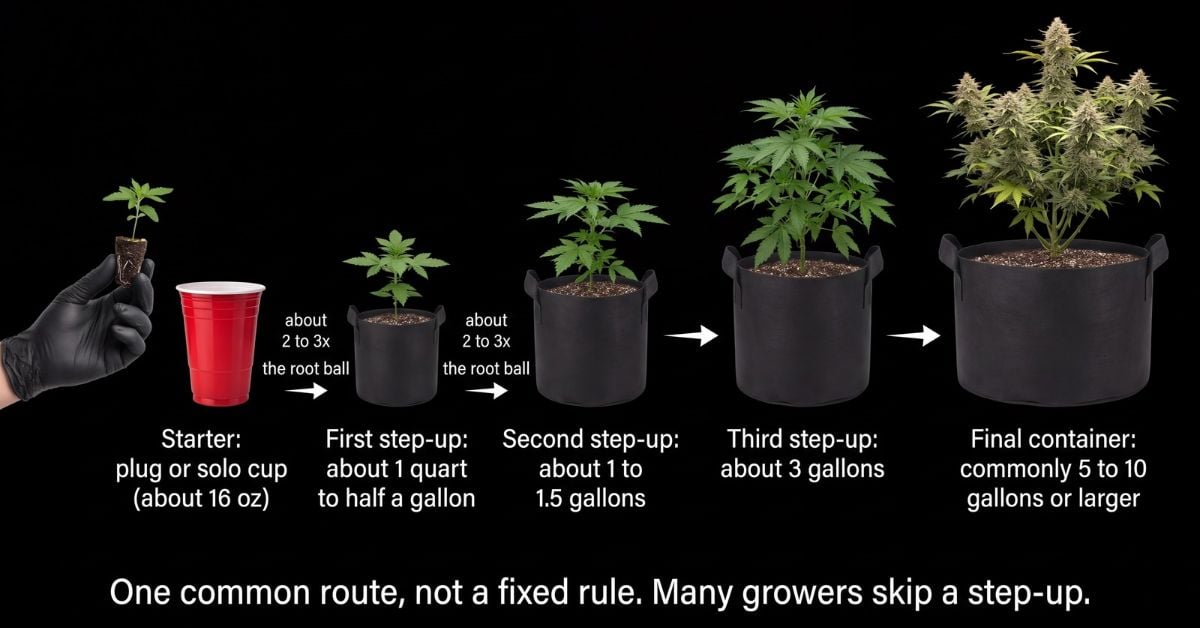
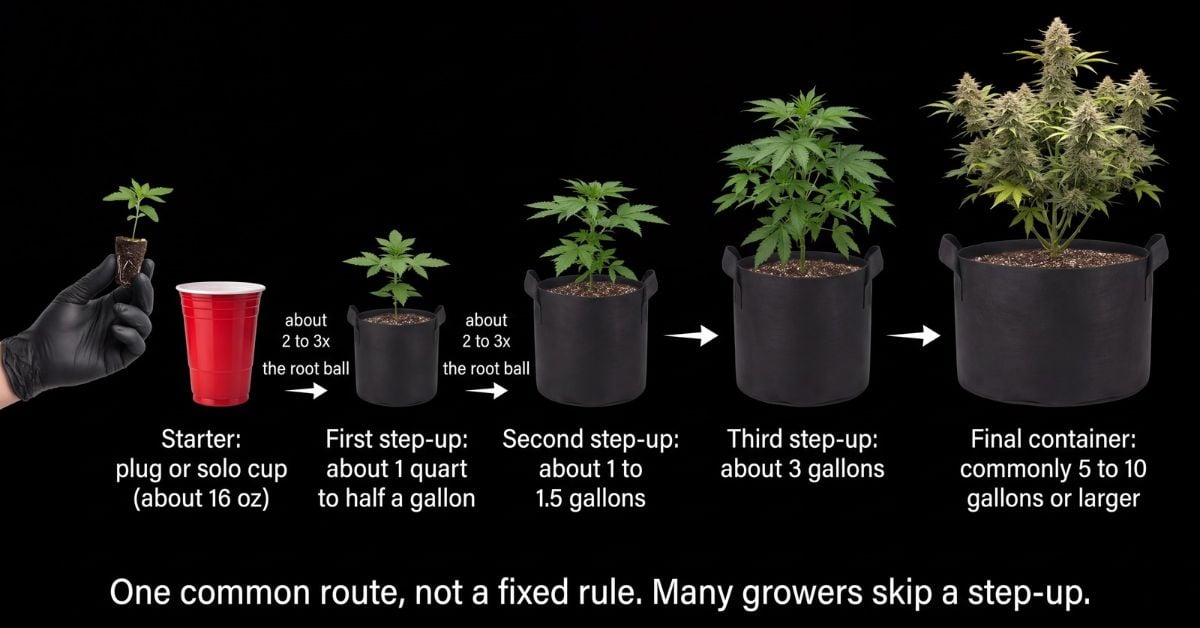
These sizes are one common route, not a fixed rule. Many growers skip a step-up and make a bigger jump to save time and handling, especially with a short veg. A long veg or a big outdoor plant calls for a final pot at the top of the range or larger. Photoperiods also keep growing taller after flowering starts, so size the final pot for the plant you’ll have at harvest, not the one in front of you.
Why Not Start in the Biggest Pot?
Starting in the biggest pot increases the risk of overwatering your weed plants. A small root system can only drink from the zone it occupies, so in a pot that’s far too big, the rest of the medium stays wet for days after each watering. Stepping up through progressively larger pots keeps the amount of wet medium matched to what the roots can actually use.
The risk is highest in dense, water-holding soil and much lower in fast-draining mixes and fabric pots. Experienced growers sometimes pot up in fewer, bigger jumps, but it takes careful watering to pull off.
Transplanting Cannabis in Fabric Pots vs Plastic Pots
Fabric pots dry faster and air-prune roots, while rigid plastic pots hold moisture longer. Choose fabric if your medium stays wet too long between waterings, which is common in a cool, humid room where water evaporates slowly. Choose plastic if the medium dries out too quickly, which is common in a warm, dry room. Fabric’s downside is that you’ll water more often.
The difference also shows at transplant time. In fabric, roots that reach the wall get air-pruned instead of circling, so the root ball you move is less likely to be wrapped in a tight coil. In plastic, roots that hit the wall keep growing around it, so a plant left too long can come out rootbound.
Volume counts for more than shape, though a tall, narrow pot dries differently from a wide, shallow one of the same size.
How to Transplant Cannabis Step by Step
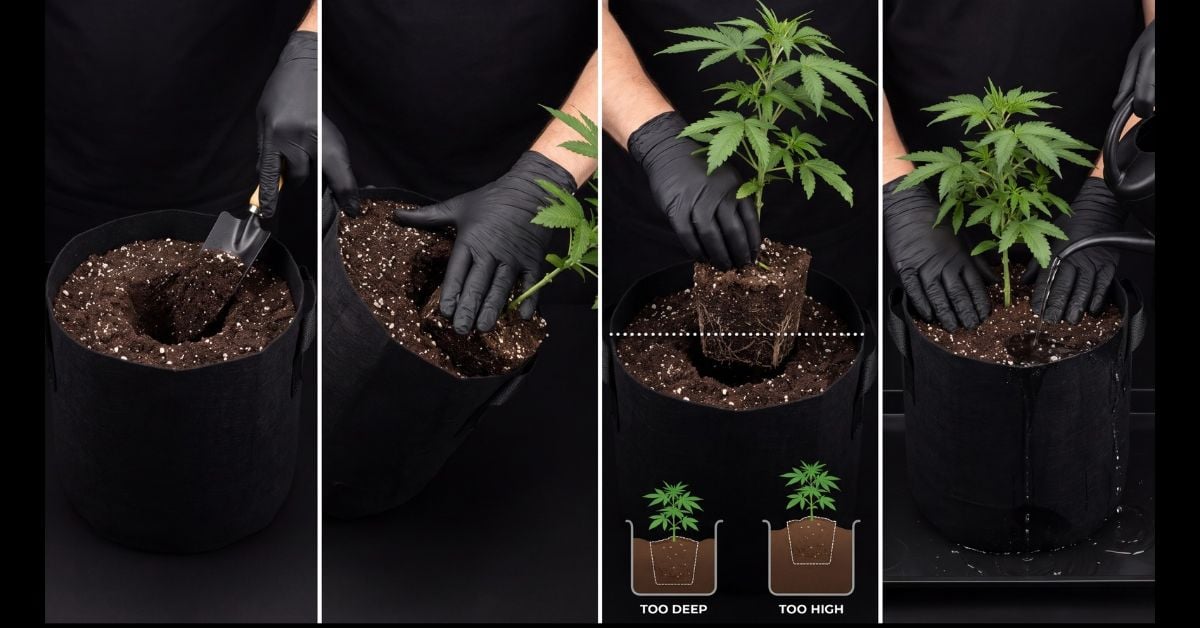
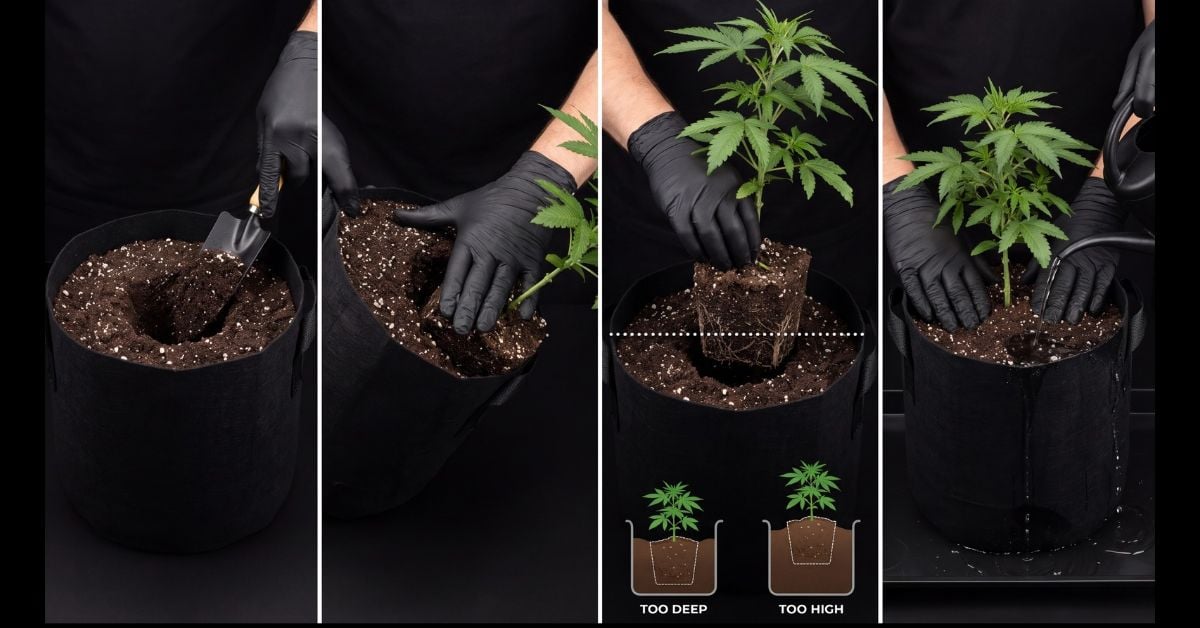
To transplant cannabis, move the root ball in one piece into a moist, pre-dug mix in the next pot size up, set it at the same depth, water it in, and leave the plant to settle. Make sure your new pot is fully prepped before the plant comes out, so the root ball is exposed for seconds, not minutes. Follow these in-depth steps:
- Prep the new pot first: Fill it with mix, moisten it, and scoop out a hollow shaped like the root ball, leaving 1–2 inches below the rim for watering. Pre-moistened mix takes water evenly once the plant is in.
- Water the plant a few hours to a day ahead: Moist medium holds together on the way out. Dry medium crumbles off the roots, and soaked medium tears under its own weight.
- Work during the quiet part of the day: Transplant at or just before lights-off indoors, or in the cooler part of the day outdoors, when the plant is losing less water.
- Lift the root ball out, don’t pull the stem: Hold the stem base between two fingers with your hand flat on the soil, tip the pot, and ease the root ball out. Squeezing a plastic pot’s sides or cutting away a disposable cup helps it release.
- Keep the root ball intact: Don’t tease, break up or wash the roots. The one exception is a badly rootbound plant with roots circling the outside, where gently loosening those outer roots is fine.
- Set it at the same depth: The top of the old root ball should sit level with the new soil surface or just below it. Too deep and the stem sits in a wet medium. Too high and the root ball wicks dry.
- Backfill and firm gently: Fill the gaps around the sides and press lightly with your fingers without packing the mix hard.
- Water it in right away: Water slowly until about 30% drains out the bottom, which settles the mix against the root ball.
- Put it back and leave it alone: Return the plant to steady conditions and skip topping, training, and defoliation that week since stacking stress slows recovery.
Clone plugs follow the same transplanting steps with two differences: shape the hollow to fit the plug, and plant the plug whole rather than pulling the roots free, because new roots are brittle.
Bury the plug so its top is level with the soil surface or slightly below it. If part of the plug sticks up above the soil, that exposed part dries out quickly and pulls moisture away from the young roots inside.
How and When to Transplant Autoflowers
Transplant autoflowers early or not at all. They start flowering based on age instead of waiting for a 12/12 light schedule, so any days lost to transplant recovery come straight out of a veg window you can't extend. Skipping the transplant removes the risk, so if you’re a beginner, it’s best to go this route.
With autoflowers, two options work well:
- Germinate your weed seeds and plant the sprouts straight into their final pots.
- Make one early transplant while the root ball is small.
Choosing the right autoflower pot size from day one is vital here — remember to factor in final plant size. If you do move an auto, act on the first clear readiness sign, not the perfect one, and avoid moving one that's already flowering.
Transplant Shock in Cannabis: Signs & Recovery
Transplant shock in cannabis is a short setback after a move, usually drooping leaves and a few days of stalled growth, while disturbed roots reconnect with the new mix. Most plants moved with the root ball intact recover within about a week with nothing more than steady conditions and careful watering, and many show no setback at all.
Signs of Transplant Shock
Look for these signs of transplant shock in the first few days after the move:
- Drooping or mild wilting: Usually starts within hours to a day of the transplant, while the roots can’t yet supply as much water as the leaves lose.
- Stalled growth: New growth pauses for a few days while the roots settle into the new mix.
- Slightly curled or clawed leaf edges: A mild curl that eases as the plant recovers.
- Light discoloration on the lower leaves: Slight fading limited to the lower leaves.
How bad the shock gets depends on how much the roots were disturbed. A root ball moved in one piece into a ready hollow often causes no visible droop. One that breaks apart, or sits exposed while the new pot is being prepared, causes much more.
How to Help a Weed Plant Recover From Transplant Shock
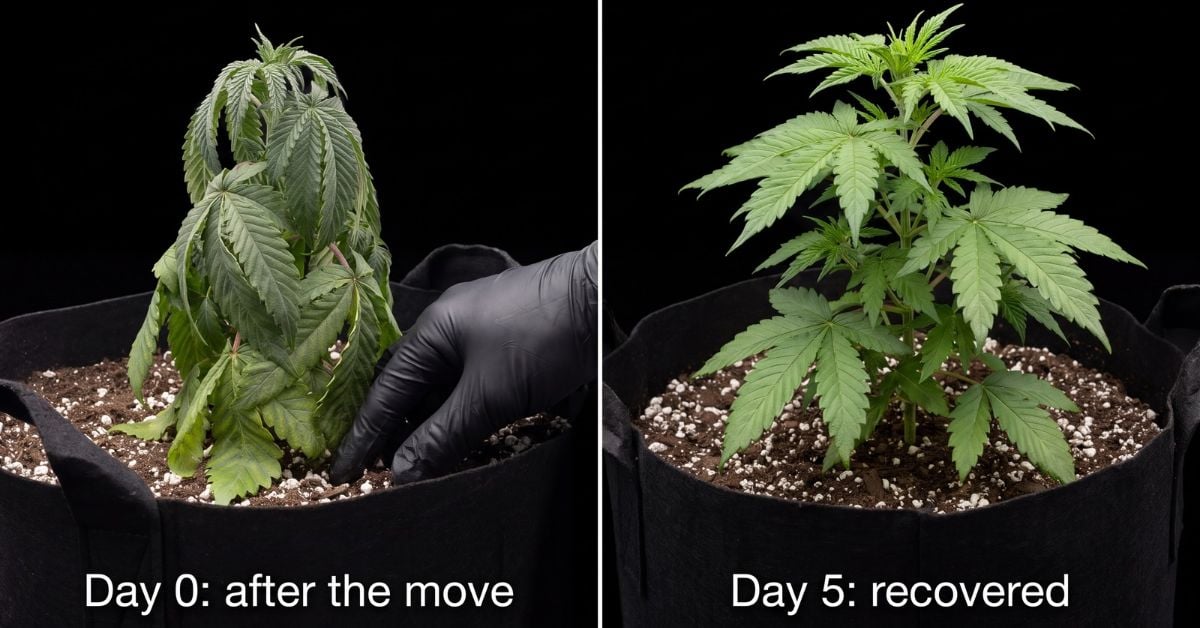
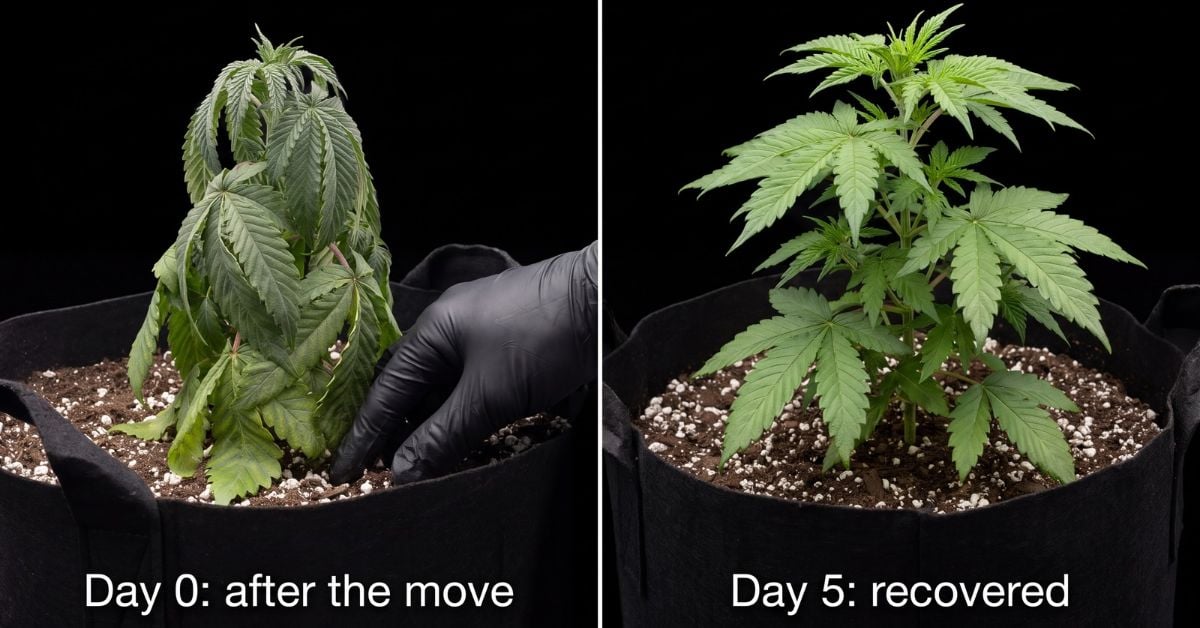
To help a plant recover from transplant shock, keep conditions steady and don’t water again until the mix starts to dry. Keep temperature, humidity, and light where they were before the move, and avoid any additional stress via topping, training, and defoliation. Dim the light only if the plant is badly wilted. Don’t repot again, and don’t add nutrients to speed things up.
Transplant shock shows up right after a move and improves day by day. Look for another cause if the plant hasn’t improved after several days, keeps getting worse, or showed these symptoms without being moved.
How Long Should You Wait to Feed After Transplanting?
In soil, wait until the cannabis plant perks up and pushes new growth, usually about 3–7 days, then restart at reduced strength. In coco and other inert media, feed at light strength from the first watering, since they hold almost no nutrients of their own.
A pre-fertilized or amended mix changes the math. It can carry the plant for a few weeks, so watch for signs of hunger, like lower leaves starting to yellow, before adding nutrients on top.
Either way, the weed plant sets the timing. Roots that aren't drinking normally aren't taking up much food either, so early feeding won't speed recovery.
How to Water After Transplanting Marijuana Plants
Water smaller amounts close to the original root ball for the first several days. Right after the move, the plant can only drink from its old root ball, while the new mix around it stays mostly untouched.
That's why overwatering risk peaks now: the pot as a whole dries far slower than the root zone. Once roots push outward, go back to watering the whole surface. Lift the pot to check. The top can look dry while the bulk is still heavy, and weight tells you what the surface won't.