
Spider mites are one of the most common pests you'll find on cannabis plants, and often the most damaging, since many growers miss them until it’s too late. Left unchecked, they sap plant vigor, cut your yield and bud quality, and can kill a young plant before you catch on. This guide covers everything you need to know about spider mites on weed. You’ll learn:
- How to identify spider mite damage.
- What spider mite eggs and webs look like.
- The causes of a spider mite infestation
- Spider mites vs deficiencies vs thrips damage.
- Safe ways to get rid of spider mites during flowering and other plant stages.
- Effective prevention tactics.
By the end, you'll know how to spot the early signs, confirm the cause, pick the right treatment for your plant's stage and prevent spider mites in the future.
TL;DR: If your fan leaves show small pale or yellow specks on top, flip a leaf over and check the underside. Look for spider mites, their eggs or fine webbing there, since that's where an infestation shows itself first. This is the fastest way to rule out a nutrient deficiency before you start treatment.
What Are Spider Mites on Cannabis Plants?
Spider mites are tiny arachnids that feed on cannabis plants by piercing leaf cells and drawing out the contents. That feeding drains the chlorophyll your plant needs to turn light into energy. Left unchecked, this steady cell damage slows growth, cuts yield and can kill a heavily infested plant.
They're arachnids, not insects, which is why most insecticides work poorly against them. The two-spotted spider mite is the species you're most likely to encounter on cannabis. Adults measure roughly 0.02 inches (0.4 mm), small enough to look like moving specks rather than distinct bugs.
Spider mites reproduce fast in warm, dry conditions. A single female can lay up to 200 eggs in her short lifetime. Left untreated, a small population can turn into a full infestation within 2-3 weeks.
How to Identify Spider Mites on Cannabis Plants
Spider mites show up first as small pale or yellow specks on the tops of your fan leaves. The mites themselves stay hidden much longer, since they feed mostly on the underside of the leaf. Flip a suspect leaf over and check closely, ideally with a magnifying loupe. Spider mites and their eggs are hard to spot with the naked eye.
Three signs confirm an infestation: damage on the leaf surface, eggs and mites underneath, and webbing once the population grows.
- Damage: pale or yellow speckling scattered across your fan leaves' tops.
- Eggs: tiny translucent spheres clustered on leaf undersides.
- Webs: fine silk strands across leaves, stems or buds.
What Spider Mite Damage Looks Like on Fan Leaves

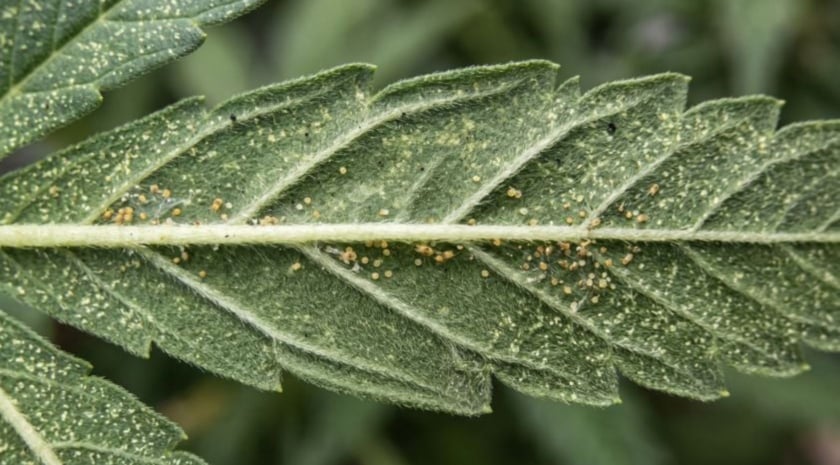
Cannabis leaf showing yellow-white stippling from spider mite feeding damage
Spider mite damage starts as tiny white or yellow dots scattered across the top of a fan leaf. It gives the leaf a stippled, dusty look. The dots spread outward from the first feeding sites as the population grows. Heavily damaged leaves turn pale, bronze or yellow, then dry out and drop.
This stippling pattern gets mistaken for a nutrient deficiency more often than any other cannabis leaf problem. Check the underside before you treat your cannabis plant for the wrong issue.
What Spider Mite Eggs Look Like
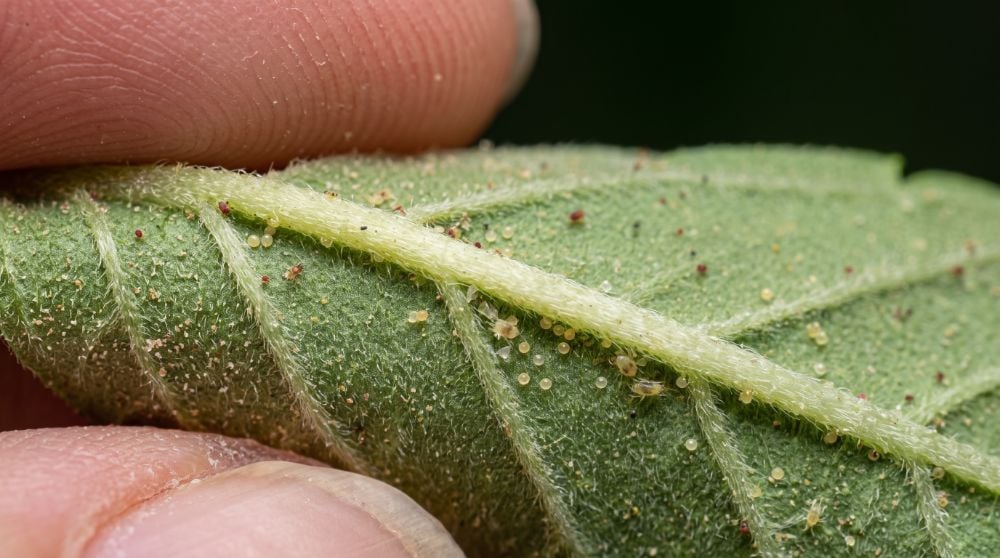
Cannabis leaf underside showing spider mite eggs.
Spider mite eggs appear as tiny, round, translucent spheres clustered on the underside of your leaves, usually near the main veins. Eggs hatch in as few as 3 days under warm conditions. That's why a single treatment rarely finishes the job.
A hatched batch restarts the visible-damage cycle within days, even after you've cleared the adult mites. Checking leaf undersides for eggs, not just adult mites, gives you a more accurate read on how advanced the infestation is.
What Spider Mite Webs Look Like
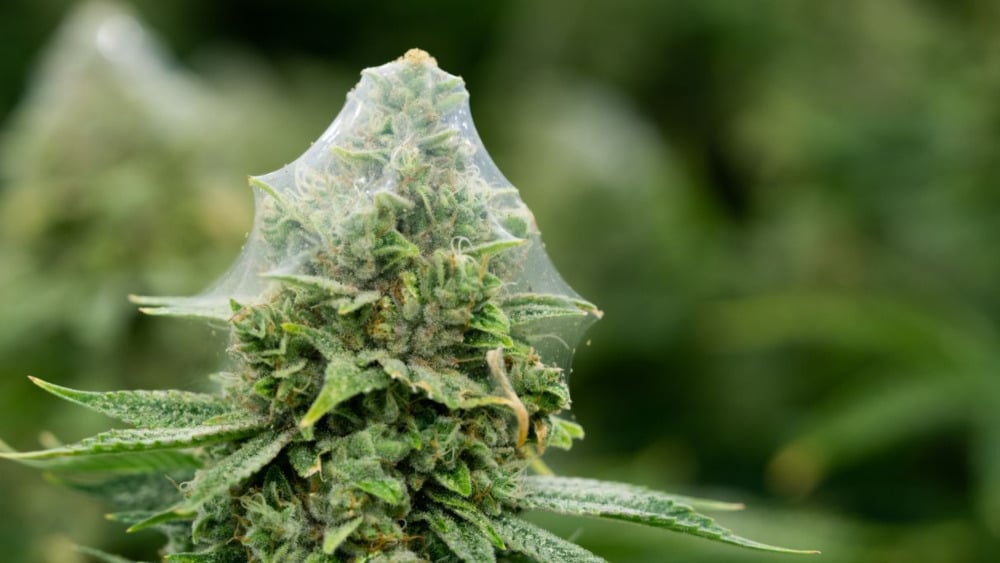
Spider mite webbing coating cannabis leaves and stems.
Spider mite webs appear as fine silk strands across leaves, stems and eventually buds. They signal an infestation that's moved past the early stage. Early webbing is sparse and easy to miss unless you check for it directly. Heavy webbing coats leaf surfaces and can trap dust and debris, which raises your mold risk once buds are covered.
Visible webbing on a plant usually means the population has been established for a week or more, since fine strands take time to build up.
What Causes Spider Mites on Cannabis Plants?
Spider mites arrive on cannabis plants through infected clones, contaminated clothing, outdoor exposure or airflow from an already-infested space. A few common entry points account for most infestations:
- New clones or plants you bring in without inspecting them first.
- Clothing, shoes or hands after contact with another grow space.
- Pets that move between outdoor areas and your grow room.
- Reused soil, containers or tools from a prior grow.
- Unfiltered air intake from outside.
None of these vectors guarantee an infestation on their own. Warm temperatures, low humidity and poor airflow speed up whatever population does arrive. Spider mites reproduce faster once your room climbs above 75°F (24°C). Stagnant air gives them the still conditions they need to spread across a plant.
Spider Mite Damage vs. Look-Alike Problems
Spider mite stippling gets mistaken for a magnesium or calcium deficiency more often than any other cannabis leaf problem. Both start as scattered discoloration on your fan leaves.
Thrips damage causes the other common mix-up, since thrips also leave small marks on the leaf surface. The table below separates the three by pattern, location and progression, so you can confirm the cause before choosing a treatment.
| Trait | Spider Mite Damage | Nutrient Deficiency | Thrips Damage | Reliability |
| Leaf-top pattern | Fine, evenly scattered dots | Blotchy patches, often along edges or veins | Silvery streaks with small black flecks | High |
| Underside signs | Eggs, moving mites, webbing | None | Visible thrips, light scarring | High |
| Progression | Spreads outward fast, worsens within days | Follows a pattern tied to leaf age | Streaks widen as flecks build up | Medium |
| Webbing present | Yes, in moderate to heavy infestations | No | No | High |
Underside signs give you the clearest answer, since only spider mites leave visible eggs and webbing on the leaf's underside. Before you reach for any treatment, turn a suspect leaf over and check with a loupe, what you find (or don't) underneath tells you more than the surface damage ever will.
The first table sorts the three problems by what they look like. The one below turns that into a next step: match what you're actually seeing to the right level of confidence and the action it calls for, so you're not treating your weed plants for the wrong culprit.
| Observation | What It Means | Confidence | What to Do |
| Small yellow or white specks on leaf tops only | Early mite feeding or early nutrient stress | Low | Check leaf undersides with a loupe before you treat |
| Specks plus visible mites or eggs underneath | Confirmed spider mite infestation | High | Start treatment right away |
| Fine webbing on leaves or buds | Established, spreading infestation | High | Treat aggressively and repeat every 3-5 days |
| Silvery streaks with black flecks, no webbing | Likely thrips rather than spider mites | Medium | Re-check for mites before you start a thrips-specific treatment |
How to Get Rid of Spider Mites on Cannabis
Getting rid of spider mites on cannabis takes repeated treatments, not a single application. Space treatments 3-5 days apart, timed to the egg-hatch cycle. One treatment kills adult mites but rarely reaches eggs that haven't hatched yet. Those eggs hatch within 3-5 days and restart the visible damage.
If you stop after one round, you'll often see the infestation come back stronger. Control comes from three tools you'll combine or sequence: environmental changes, direct treatment and predatory mites.
- Environmental and cultural controls: lower your temperature and raise airflow.
- Spray and predatory mite treatment: pick one program, not both.
- Flowering-stage treatment: a narrower list of safe options.
Environmental and Cultural Controls
Lowering your room temperature and raising airflow slows spider mite reproduction, even though it won't clear an existing population on its own. A steady breeze from a fan makes it harder for mites to move between leaves and mate, since they favor still, warm air. Keeping temperatures below 80°F (27°C) removes one of the conditions mites need most.
Humidity is a lever too. Spider mites thrive in dry air, so nudging humidity up during vegetative growth and early flowering slows their development and buys you time. Back it off once buds form, though, since high humidity around dense flowers invites mold.
A small population can otherwise turn into a heavy infestation within 2-3 weeks, so pair these changes with active treatment rather than relying on them alone. Removing fallen leaves and cleaning your grow space between treatments cuts down on places mites can hide.
Spray and Predatory Mite Treatment Options
Most growers choose between a botanical spray program and a predatory mite program, since running both at once works against your goal. A spray applied anywhere near your beneficial mites kills them too, so committing to one approach per grow cycle gives you the best results.
OMRI-listed sprays made from oils like rosemary, clove, cinnamon, thyme or peppermint kill spider mites on contact and are labeled safe through harvest. Insecticidal soaps work the same way. Because these are contact killers with little to no lasting residue, coverage is everything: the mites live on the undersides of your leaves, so spray there, not just the tops.
A fine mist or fogger that coats the underside reaches them where they hide. Plan on repeat applications a few days apart to catch mites that hatch after your first pass, since a single spray rarely clears an established population. The trade-off is that these same sprays kill any predatory mites you've released.
Predatory mites hunt spider mites directly and leave no residue, which makes them a clean option for an ongoing biological program.
Phytoseiulus persimilis is the one to reach for on an active outbreak: it's fast-feeding and eats spider mite eggs, nymphs and adults, though it will move on or die off once the prey runs low, so it's a corrective tool rather than a standing guard.
Neoseiulus californicus holds up better at low pest levels, which makes it suitable for prevention and steady background control. For a hands-off setup, slow-release sachets hung in the canopy act as tiny breeding colonies that release hunters into the plants over several weeks.
Pick one approach for a given grow cycle: sprays if you don't run beneficial insects, predatory mites for an ongoing biological program. Whichever you choose, follow federal, state and local cultivation rules, since legal growing conditions vary by location.
How to Get Rid of Spider Mites During Flowering
Flowering plants narrow your safe treatment list to predatory mites and OMRI-listed botanical sprays. Dense buds limit spray penetration, and most treatments carry more risk to bud quality at this stage. The bigger problem is webbing: once mites spin silk across your flowers, it traps dust, debris and dead mites inside the buds, drives up mold risk and is almost impossible to clean out.
That's why catching them early in flower matters more than at any other stage.
Predatory mites are your best option here, since they operate inside the canopy without any spray reaching your buds directly. Release them at the first sign of activity, though. They knock back a working population but won't rescue a plant that's already webbed over, and a flowering plant has limited time left to recover.
If you do spray, keep it to the leaves and outer canopy rather than soaking the buds, since wet flowers invite the mold you're trying to avoid.
A diluted isopropyl alcohol mix dabbed directly on visible mite colonies can work as a spot treatment, kept well off the buds and used sparingly, since alcohol can burn plant tissue.
At harvest, a brief hydrogen peroxide wash followed by a clean water rinse removes any remaining mites, eggs and webbing from your finished buds. Dry them thoroughly with gentle airflow afterward before moving into your normal dry and cure, since buds that go in wet are prone to rot.
How to Prevent Spider Mites on Cannabis Plants
Preventing spider mites starts with quarantining every new clone or plant before it enters your main grow space. Most indoor infestations trace back to a clone or plant that carried mites or eggs in undetected. A 2-3 week quarantine period, combined with a close inspection under magnification, catches most problems before they spread.
Quarantine New Clones and Plants
New cannabis clones and plants carry the highest risk of introducing spider mites into your established grow. Inspect every incoming crop under a loupe and check both sides of the leaves to catch most visible eggs and mites before they spread.
Dip small plants in room-temperature water treated with a mild insecticidal soap to add another layer of protection. Keep new plants separate from your main grow for 2-3 weeks to give any missed eggs time to hatch and reveal themselves.
Keep the Grow Room Clean and Well-Ventilated
Stagnant, humid air gives spider mites the exact conditions they need to reproduce quickly and spread between plants. Strong airflow across your canopy makes it harder for mites to settle and mate, while also helping treatments dry faster once applied.
Removing dead leaves and plant debris regularly closes off places where mites and eggs can hide between grow cycles. Changing clothes after visiting another grow space, and keeping pets out of your grow room entirely, closes two of the most common entry points.
How Starting From Seed Lowers Spider Mite Risk
Cannabis seeds arrive free of the spider mites that commonly hitchhike in on clones or weed plants from another grow. They carry whatever pests or eggs that were already present on the mother or neighboring plants. A seed starts as a clean slate with no inherited pest exposure.
That difference matters most if you've dealt with a stubborn mite population before. Starting fresh from seed removes your single biggest introduction risk.
If you do prefer clones, source them carefully. Lab-tested, certified pathogen-free clones from a reputable supplier are the safest bet, since they've been screened for the pests and diseases that ride in on unvetted cuttings.
Pair that with a proper quarantine and inspection before they join your main grow, and you close off most of the risk a clone would otherwise carry.